Sally Hansen Insta-Ombre [partial]
Tuesday, June 09, 2015

How many of you are ombre-impaired like I am? As much as I try, I can never get the perfect gradient...granted, I never really try for that long either. Practice makes perfect!
Well, for those who don't have the time to do a perfect gradient and want something quick and on-the-go, try the *NEW* Sally Hansen Insta-Ombre polishes! They're sparkly glitter polishes meant to give you an instant ombre effect on your nails.
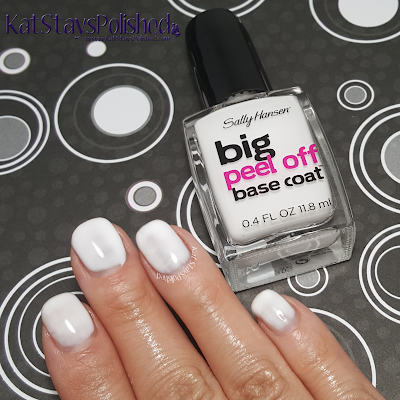
I also have the Big Peel Off Base Coat that I tried with these so I'll quickly go over that and then show you the 4 shades I swatched.
The directions for the peel off base coat say to lay on a thick layer and to let it dry completely before applying a base coat and your regular polish. So, I did just that - I put on a pretty thick layer on my clean, bare nails.
This took FOREVER to dry. I think I waited 15 minutes for the picture below. I couldn't add my regular mani on top until about 25 minutes later to ensure complete transparency [no white].
As for the peel off capability, it did fantastic! This is a base coat, 3 layers of glitter, and a top coat. It took a little bit of work at the cuticle end of my nail to start but after a while, it slowly started to come away from my nail.
I used my cuticle pusher to gently scrape away the peel off base. It got everything off. A little bit of rubbing alcohol on a lint-free wipe takes away anything left behind, which isn't much. Overall, I'm pretty happy with the way it performed. It did say to not get your hands wet in hot water until at least 3 hours after application. I did not do a long wear test on this, but from what I've seen after just a day, I imagine it'd last as long as an average manicure lasts.
If you are pressed for time at the beginning of your manicure, then I'd say this is not the product for you. If you know you're going to want to wear your glitter mani for a while, then go ahead and spend an extra 30 minutes on this mani. It peels off fantastically!
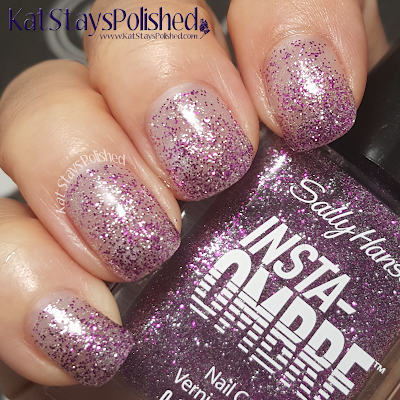
So now we get to the glittery part of the post. These are the directions for how to use these Insta-Ombre polishes. First, apply one coat to clean, dry nails. Next, apply a second coat from mid-nail to the tip. Finally, apply a third coat to only the nail tip.
So, this first shade is called Fuchsia-nista. This is full of silver and fuchsia colored microglitters. My first coat went on pretty evenly. You may want to make your first coat a little thicker since the area of the nail closest to the cuticle will *only* have that first layer of polish. Applying the rest of the layers went well. You have to wait a little bit to make sure the polish is dry and doesn't drag with the 2nd and 3rd layers of polish. I found it kind of hard to see the ombre effect in these close-up pictures, but from a distance, you can definitely tell.
Gold Grade gives you a delicate ombre look. This gold and silver mixture adds the perfect amount of glimmer to your nails. If you're rocking a neutral look with your outfit, this would be the perfect accent.
Scarlet Spark is a red and silver mixture that, in my opinion, could have been denser with the red glitters. I feel like this one needed just an extra amount of oomph to be successful. Still a very pretty polish though.
Layer on Lilac is way too sheer for me. The purple glitters are definitely dark enough but like Scarlet Spark, there could have been a higher purple to silver glitter ratio.
More from Sally Hansen:
*Products were provided for an honest review. All opinions are 100% my own.


21 comments
Interesting idea for these polishes.
ReplyDeleteCute! The peel off base looks exactly like white glue (& even applies/dries the same).
ReplyDeleteI need this! I like to wear glitter but hate the removal process.
ReplyDeleteUgh that dry time. The polishes are gorgeous on you though!
ReplyDeleteThis looks so cool!
ReplyDeleteThe concept is an interesting one but doing a glitter gradient is so easy and I have so many glitters, it doesn't make sense to go buy glitters that ombre themselves. They do look good, tho! :D
ReplyDeleteI didn't realize the ombre would be so sparkly. Can you start with a color first or would that ruin the effect?
ReplyDeleteYou could definitely put a base color down and then layer the glitter that way. As long as it isn't darker than the glitter, I don't see why it would make a difference.
DeleteOmbre sparkly, I love!
ReplyDeleteWow, that glitter peel off base coat took a loooong time to dry. I'm too impatient, but the results are worth it. I like the gold glitter best! I've done that technique with lots of glitters before, but it's cool that these are formulated to work that way.
ReplyDeleteOh yes! I'm definitely interested in trying these out!
ReplyDeleteLove the peel off base.. but the glitters are probably something I would pass on!
ReplyDeleteVery cool formulation!
ReplyDeleteI'll definitely be getting Gold Grade the second I see it in stores!
ReplyDeleteI really need to try a peel-off basecoat.
ReplyDelete?Wow - I want to really try that peel-off base coat and these glitters are gorgeous, I have my eyes on Gold Grade.
ReplyDeleteOhh these look fun! I need to try that Peel Off Base!
ReplyDeleteThe peel off base is so genius!!
ReplyDeleteI love a peel off base for glitters. I don't wear glitter more than a day and peeling it off just makes it worlds easier to remove!
ReplyDeleteThat looks great!
ReplyDeleteCan't wait to try these glitters!
ReplyDelete